Beginner's Guide
Whether you’re looking to learn more about the game or have encountered something you’re not sure how to approach, we’ll give you the tools necessary to enjoy your time in BeamNG.drive! This guide will cover just about everything a beginner would need, including information on game modes, menu navigation, fundamental controls, basic troubleshooting, and much more.
Game Modes
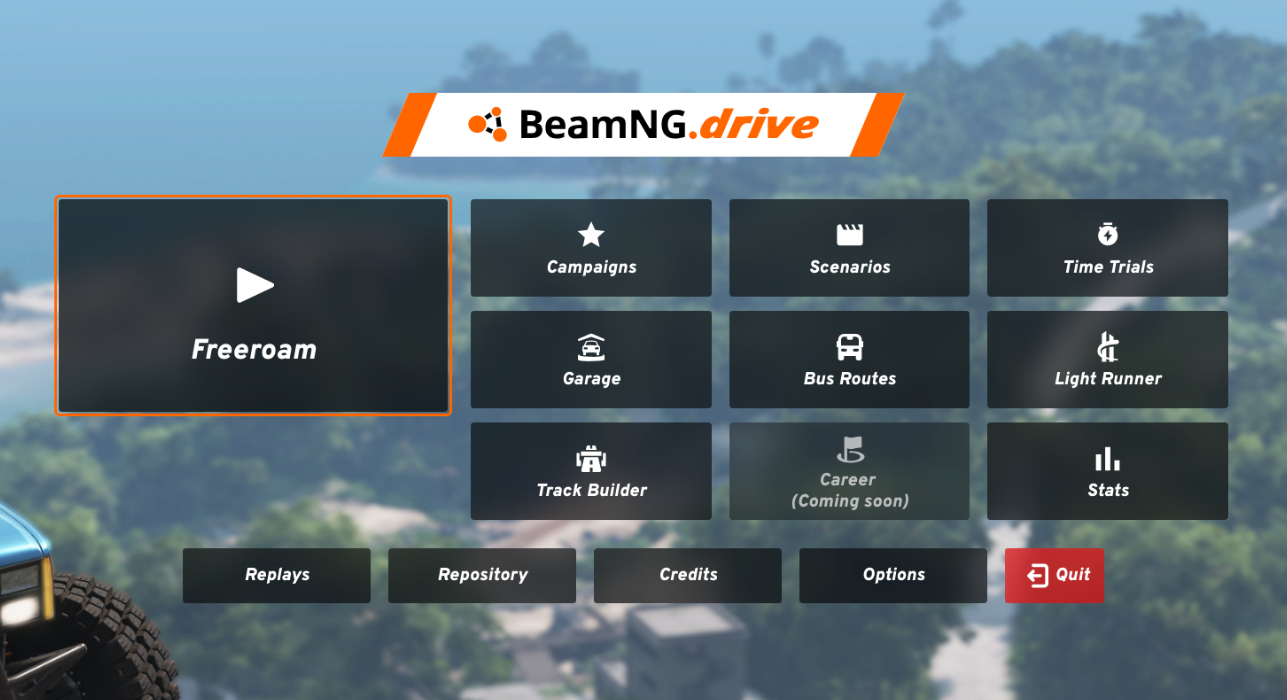
Freeroam
Complete freedom. You can customize your car as you see fit (see customization guide here ). This is as close to limitless as you can get, so be sure to experiment with you car and the in-game world around you!
Scenarios
Scenarios are small, contained mission maps - usually one mission per map. The scenarios created by the BeamNG.drive team can be found via the BeamNG.drive icon in the corner of the map. The scenarios are also divided according to their complexity, from the simplest to the most difficult. Can you drive to a gas station without fuel? Or gently descend a steep cliff? Everything depends on you and your abilities. We recommend starting with the simplest of scenario difficulties. By doing this, you will become more acquainted with the game and master the control of the car. As you move from simple to complex scenarios, you will improve, and many of them will make you motivate you to clear them as accurately and quickly as possible.
Time trials
Here, it’s all about competing with yourself. If you wish, you can always share your results with the players on the forum or in the discord. Keep in mind, however, that some cars require more careful handling, and harsh acceleration can cause skidding.
Garage
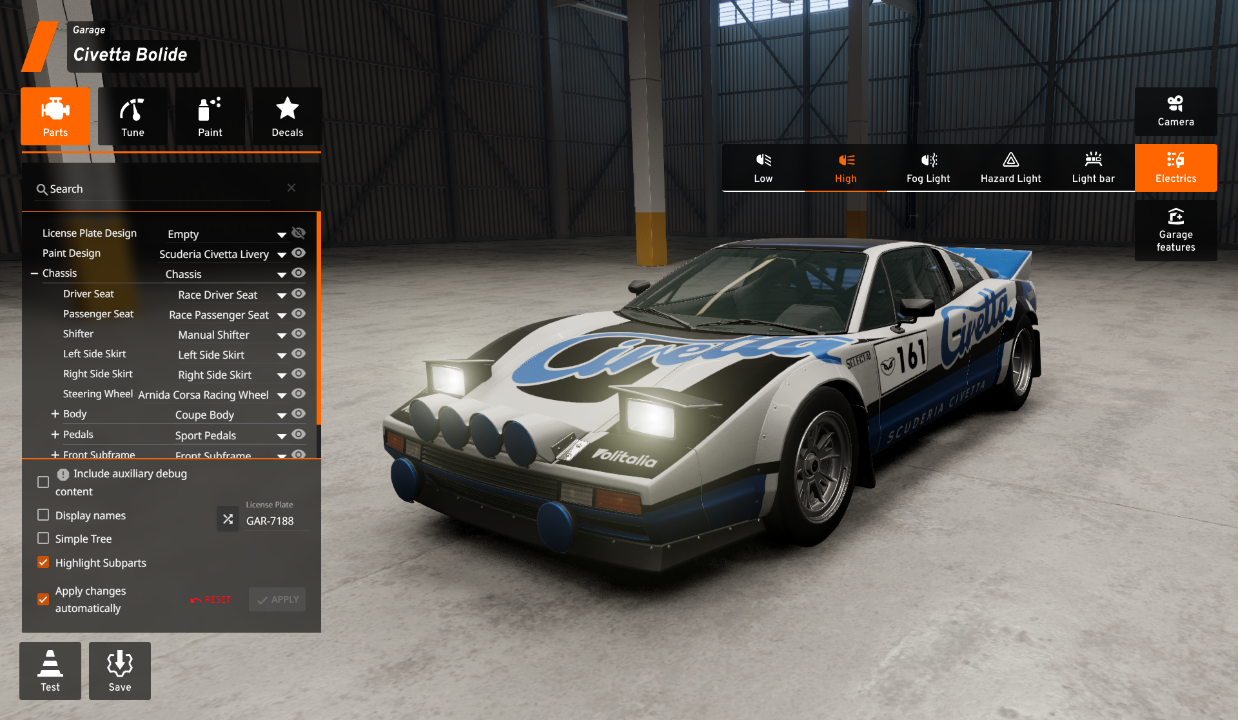
BeamNG.drive’s Garage mode provides users with a comprehensive and immersive experience for vehicle customization and inspection. Within this mode, enthusiasts can:
- Inspect their vehicles
- Explore and change parts
- Tune the setup of the installed components
- Paint the vehicles for a more personalized look
A notable inclusion is the work-in-progress decal editor, allowing users to create and apply custom liveries to their vehicles without the use of external softwares.
Moreover, Garage mode extends beyond mere customization by incorporating a Photomode feature. Users can manipulate the controls of the garage lights to achieve the perfect lighting conditions for capturing stunning shots of their customized vehicles.
Bus mode
In this mode, you can feel like a bus driver! But don’t underestimate this, as some routes can be quite complex. For example, you might be tasked with taking loads of sharp angles that busses wouldn’t normally take. You can also balance and maneuver along short streets or steep slopes. This is a great way to take on a vehicle that feels very different in how it drives!
Campaigns
There are a variety of Campaigns, each with their own goals and conditions. Check them out and see which one appeals!
Light runner
This is one of the most unique modes offered in BeamNG.drive. The usual laws of physics apply here, but you are high above the ground, and the turns can have you almost going vertical!
Track builder
Here you can build your own race track and naturally test it. Using the menu, you can create tracks in almost any shape. It’s all up to your imagination!
In addition to standard maps and scenarios, cars and their modifications, you can use player-created maps. You can find them in the repository or on the forum. We kindly ask you to be careful when installing mods from third-party sites.
You can read how to use mods here .
User Interface
There are a number of menus and interfaces you’ll encounter in BeamNG.drive. There’s basic features, but also loads of other menu and layout options that can allow you to tailor your gameplay even further. Here’s a breakdown of each one’s purpose and various options.
Default UI
Default UI is activated by default in all game modes. You can always add more UI apps if you want to - although you will not be able to add a second instance of a UI app you already have on your UI.
To learn how to add UI apps, please check this article .
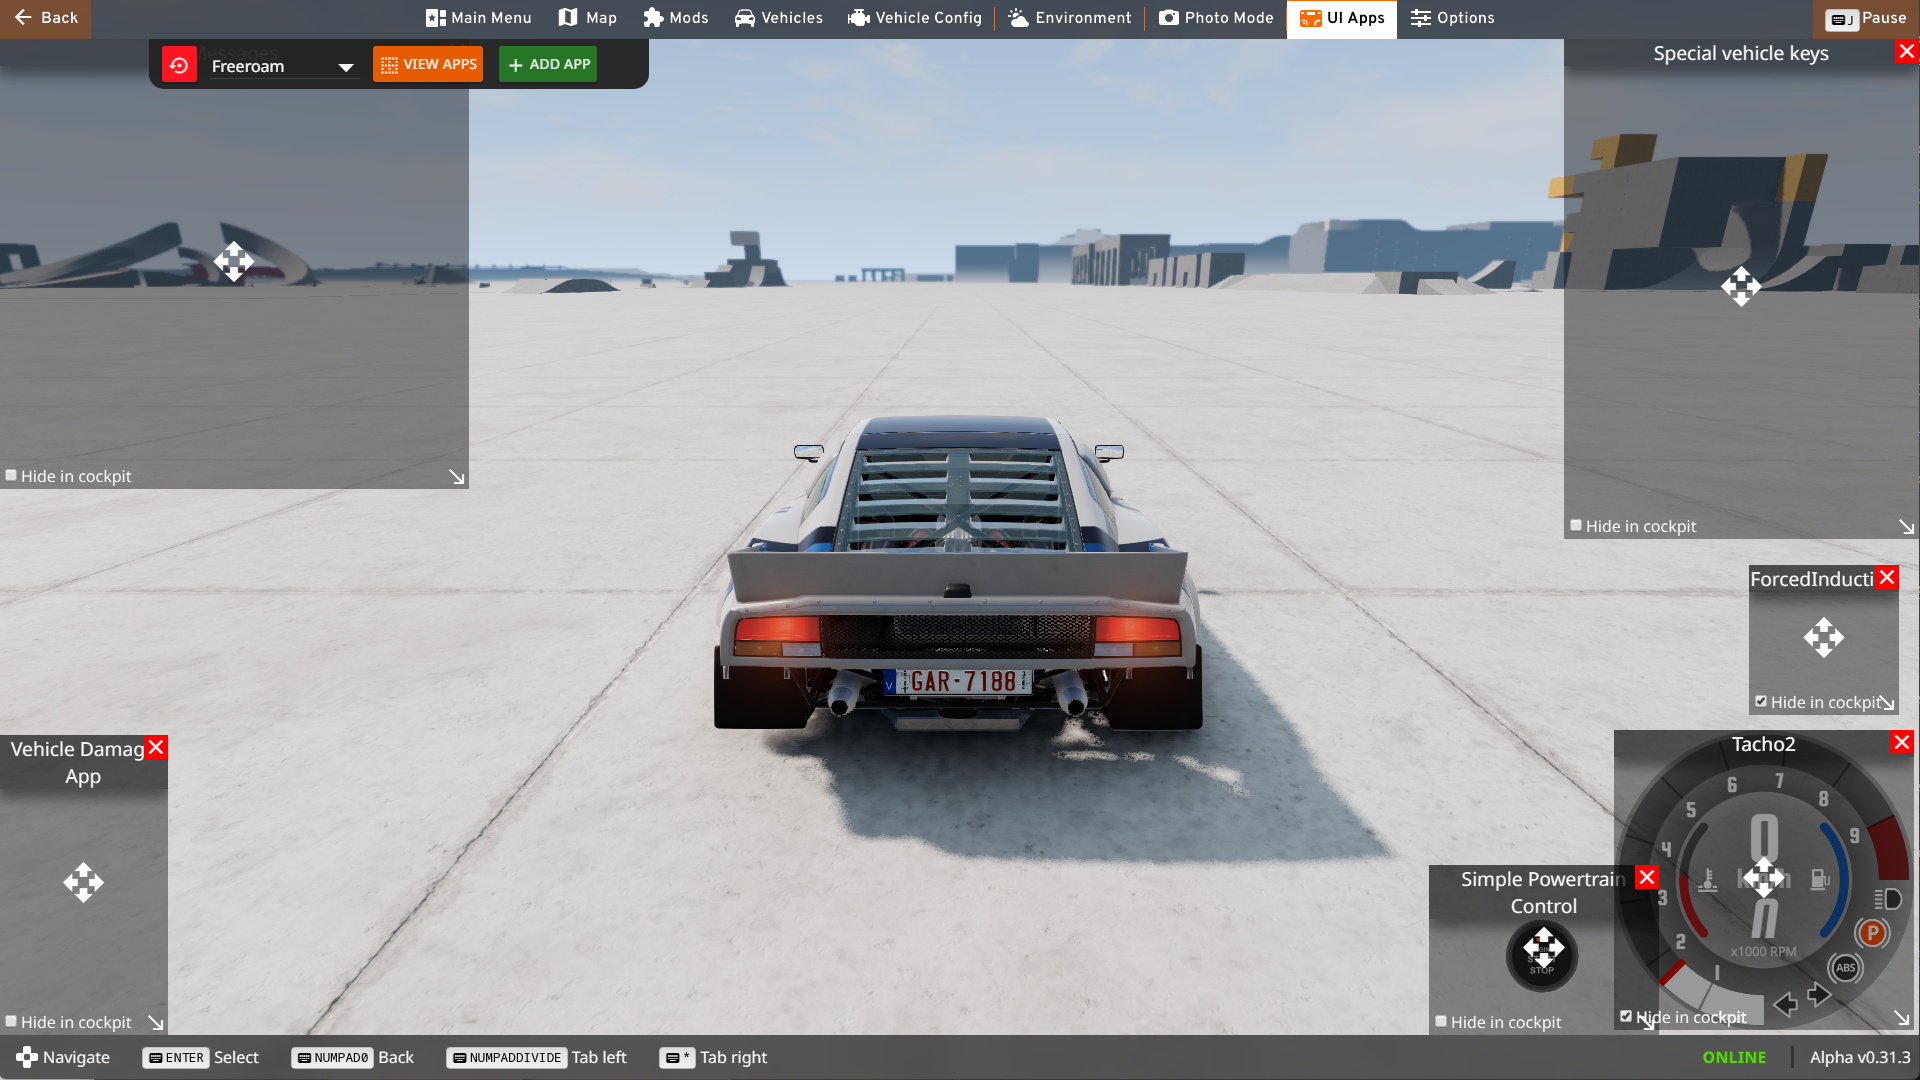
Default Apps
- Messages - space for alerts (an example of this is a message indicating car damage)
- Vehicle Damage app - displays current state of different vehicle systems
- Race Time - the use of this app depends on if the game mode shows a timer for finishing a task or not
- Race Countdown - Countdown for start of a race/task
- Force Induction - displays pressure gauge (only for applicable vehicles)
- Tacho 2 - Tachometer - displays RPM and speed of the vehicle
- Simple Powertrain Control - allows selecting powertrain modes (only for appicable vehicles)
Here are some additional UI apps worth trying out to get the most out of your BeamNG.drive experience:
- Simple Brake Thermals - shows brake temperature
- Replay - Replay control (learn more )
- Navigation - minimap
- AI Control - AI control panel (learn more )
Side Menu

- Main Menu - displays the main menu
- Map - overview of the current level, displaying all the available missions, allowing to teleport around, and so on..
- Mods - in-game mod repository and mod manager
- Vehicles - vehicle selector from where you can change or spawn new vehicles, trailers and props
- Vehicle Config - vehicle parts selector also containing the tuning menu and configuration save/load menu
- Environment - settings for the time of day, weather, gravity and so on..
- Photomode - mode specifically designed to take artistic screenshots of the game
- UI Apps - edit, modify UI apps, as well remove/add them from the current layout
- Options - General Game Settings
Radial Menu
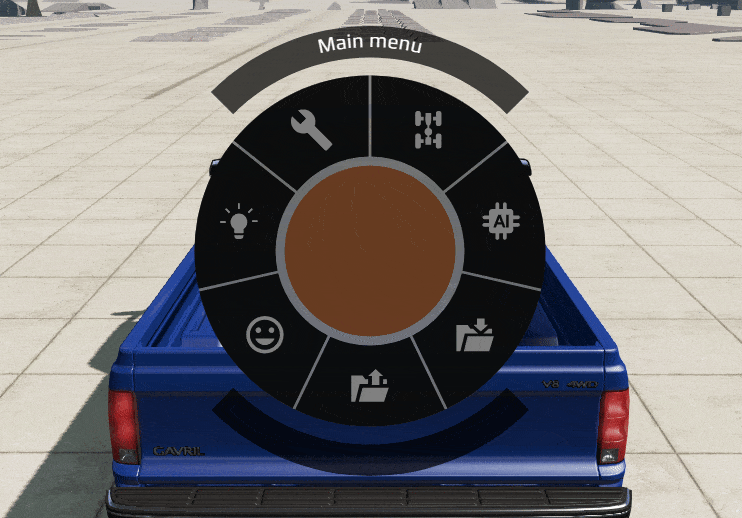
You can control additional features through the radial menu. The menu offers easy access to the key functions which are described further below.
-
Manage - Controls for managing vehicle and spawns
- Select - Select a new vehicle
- Home - Vehicle goes to the original spawnpoint
- Set home - Sets a new spawnpoint
- Remove - Remove current vehicle
- Clone - Clone current vehicle
-
Powertrain - Controls for all powertrain options
- Gearbox mode - Toggle gearbox modes. (can also be bound to Q)
- 4WD modes - Controls for 4WD modes (available on specific vehicles)
- Rangebox mode - Toggle rangebox modes
- Engine - Toggle engine ignition (binding V)
-
AI - Controls for different AI options
- Spawn (Normal) - Spawn a group of vehicles
- Spawn a group of vehicles including police (this can be fun with chase mode)
- Stop traffic - Stop traffic mode (Stop traffic. while traffic is stopped you can switch between cars using tab)
- Remove Traffic - Removes all AI traffic vehicles
-
Electrics - Controls for electrical components
- Light bars - Toggle light bar
- Signals - Controls for turning signals
- Fog light - Toggle fog lights (available on certain cars)
- Hazard light - Toggle hazard indicators
- Headlights - Controls to toggle different headlight options (low/high)
-
Fun stuff - Controls for fun stuff
- Fire - Set the vehicle on fire
- Hinges - Breaks all the vehicle hinges
- Tires - Deflate the vehicle tires
- Boom - Explode the vehicle
- Break - Break all components on the vehicle
- Extinguish - Extinguish any fires on the vehicle
- Force Field - Pushes away any vehicles around you
- Close Latches - Tries to close all latches
- Open Latches - Tries to open all latches
-
Cruise Control Cruise Control Settings
- Toggle - Turn Cruise Control on or off
- Resume/Speed Up - Turn Cruise Control back on at its previous speed, or increase the speed while it is active
- Set/Slow Down - Set Cruise Control to use your current speed, or decrease speed while it is active
- Cancel - Deactivate Cruise Control while remembering the last set speed
-
Load - Load previously saved vehicle
-
Save - Save vehicle in its current form
Camera
The camera options in BeamNG.drive are yet another component of the game that fuels creativity. Below is a large selection of camera functions that can produce cinematic moments, interesting angles, and even help with any content creation ideas you may have.
Camera Modes
Camera modes options can be found via the options menu: Esc -> Controls -> Camera
You can set the switching order via Camera settings: Esc -> Camera
There are seven camera modes to choose from, each offering a vastly different perspective to experiment with.
Switching between Camera modes can be performed by pressing C (order can be set up via Esc -> Camera) or keyboard 1-7
| Mode | Shortcut (default) | Description |
|---|---|---|
| Orbit | 1 | Camera is anchored around the vehicle. Move it around your car for better viewing. |
| Driver | 2 | Camera is anchored inside the vehicle. You can move the camera inside the car, for example, for inspecting the cockpit. |
| Onboard.Hood | 3 | Camera is anchored on the front of the vehicle. Almost the same as driver mode, however the interior of the car is hidden. |
| External | 4 | Cinematic Camera mode. Camera switches to different points of view following the vehicle. This can be used for creating amazing videos. |
| Relative | 5 | Camera is anchored to a custom position following the car. You can set a point somewhere outside of the car and enjoy the ride from that point of view. |
| Chase | 6 | Cinematic camera that follows vehicle roll (can be adjusted in the settings). |
| Top Down | 7 | Camera is anchored to the top of the vehicle. |
| Free Camera | Shift + C | Allows you to freely move the camera around the map to get the most comprehensive view possible! |
Slow motion
Slow motion is a powerful and epic tool for capturing great moments while driving. To activate slow motion, press Alt+↑ or Alt+↓
You can increase the motion speed with Alt+→, and decrease motion speed with Alt+←. The game will slow down by x2/x4/x8/x16/x100 times, providing you with loads of variety for content creation, or simply admiring the game.
Screenshots
This feature is crucial for capturing a great moment during gameplay that you can save for yourself, or perhaps share with others! Here’s a quick rundown of some key screenshot features:
- Scroll Lock - pauses the game
- Alt+P - takes and saves a screenshot at x4 of your current resolution (3840x2160)
- Ctrl+P - takes and saves a screenshot
- Huge screenshot binding can also be assigned. This will take a screenshot at x8 of your current resolution. Warning: The game may freeze for a moment. Just wait a few seconds for this to be addressed on its own.
- Alt+O - takes and uploads a screenshot to the BeamNG media server. The generated URL contains additional game information used for troubleshooting issues with graphics. This screenshot can also can be used for sharing camera position.
- F12 - creates a screenshot in your Steam library, which can be uploaded by navigating to
Steam -> View -> Screenshot.
If standard screenshot options are not enough, there is also photo mode. For a full tutorial on the tool, please see this article .
Controls
Here’s a breakdown of the basic controls in BeamNG.drive!
Please note that some controls may be car specific. We recommend checking them out while you are in an active car by navigating to Options → Controls.
The controls may also vary depending on what you prefer to play on. Whether that’s a mouse and keyboard, controller or steering wheel setup.
- You can see the steering wheel setup instructions here .
- You can see the list of compatible devices here .
You can find all assigned control buttons in the options, you can always reassign them as you see fit.
Driving
- ↑ - Throttle
- ↓ - Brake
- ← - Steering (left)
- → - Steering (right)
- Space - Temporary Parking BrakeSpace
- P - Parking Brake (permanent)
- LShift - Clutch
- X - Shift Up
- Z - Shift Down
- Q - Toggle Gearbox Mode
- V - Engine Starter Motor
- H - Horn
- N - Headlights
- Alt+N - Foglights
- , - Left Signal
- . - Right Signal
- / - Hazard Lights
- M - Lightbar Lights
Gameplay
- Shift+R - Reset all vehicle physics
- R / I - Reset physycs
- Insert - Recover Vehicle
- Ctrl+Tab - Switch to previous vehicle
- Tab - Switch to next vehicle
- Ctrl+Home - Set home position
- Home - Load home position
- F8 - Drop Camera at Player
- F7 - Drop Player at Camera
- E - Enter/Exit vehicle
General
- J - Pause/Resume physics
- Alt+F4 - Quit the game
- Alt+Enter - Toggle Fullscreen
- Alt+U - Hide UI
Node Grabber
You can use the Node Grabber tool to attach trailers or couple other objects to the vehicle.
Mods
Now that you are familiar with the basics of the game, you can explore a myriad of community mods to spice up your gameplay. Below you will find instructions on where to find, how to install, and how to use mods:
WARNING: It’s recommended to not exceed with the number of active mods at the same time to avoid affecting the game’s performance. Make sure the mods you are using are up to date and compatible with the version of the game you are using!
Was this article helpful?