Pressure Wheels
The pressureWheel is the primary method for creating wheels in BeamNG. It is a real time physical tire model made from nodes, beams, and triangles.
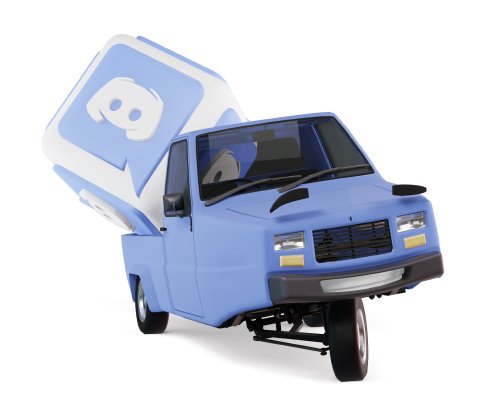
The pressure wheel system will automatically generate a wheel with the defined parameters around a pair of nodes which acts as an axle. The position and orientation of the nodes determines the position and orientation of the wheel.
Due to their complexity and large number of parameters, it is recommended that you copy sections of vanilla jbeam when using pressure wheels, and modify the things that are needed.
Wheel construction
Wheels are made out of two primary components.
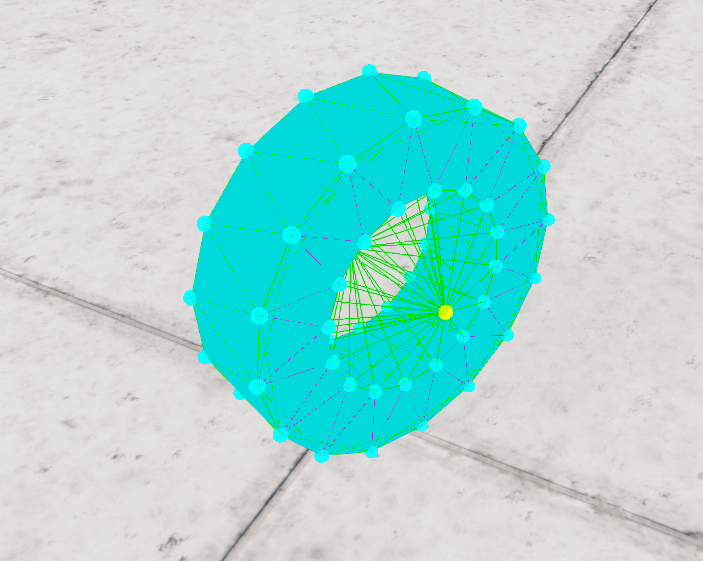
The first element is the hub, which matches with the exterior layer of the rim. Those nodes are attached to the axle, a set of 2 predefined nodes that are attached to the vehicles hub.
The second element is the tire, which has it’s own set of nodes on the exterior layer of the tire, connected to the hub nodes with multiple beams. A pressure group is also set-up using both the hub and tire nodes.
The beams between the hub and the axle are fairly rigid standard beams, to represent the rigid structure of a wheel.
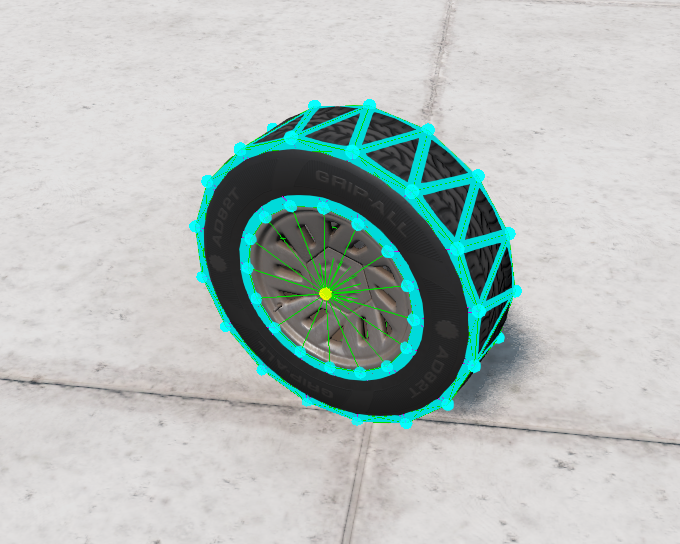
The tire nodes are linked to the hub node and each other with a mix of beams to represent the structure of the tire, and allow for tread deformation and sidewall flex.
The radial beams are the main weight bearing nodes on the tire. They are generated as anisotropic beams, allowing them to be quite soft in compression, to simulate the squishiness of tires, while still being strong in extension, keeping the tires from expanding at higher speeds.
Reinforcement beams link the tire nodes on one side to the wheel nodes on the other side. They assure the lateral rigidity of the tire, but can still allow for some amount of sidewall flex under cornering like a real tire.
Tire friction parameters
In order to replicate as closely as possible the behavior of real life tires, the pressure wheel system has multiple more advanced friction parameters based on sliding speed and the load on the tire.
Each ground surface in beamNG has a static and sliding friction parameter, along with a stribekVelocity which affects the transition between static and sliding friction.
The tire’s various friction parameters are defined as multipliers of those various friction parameters.
Friction velocity
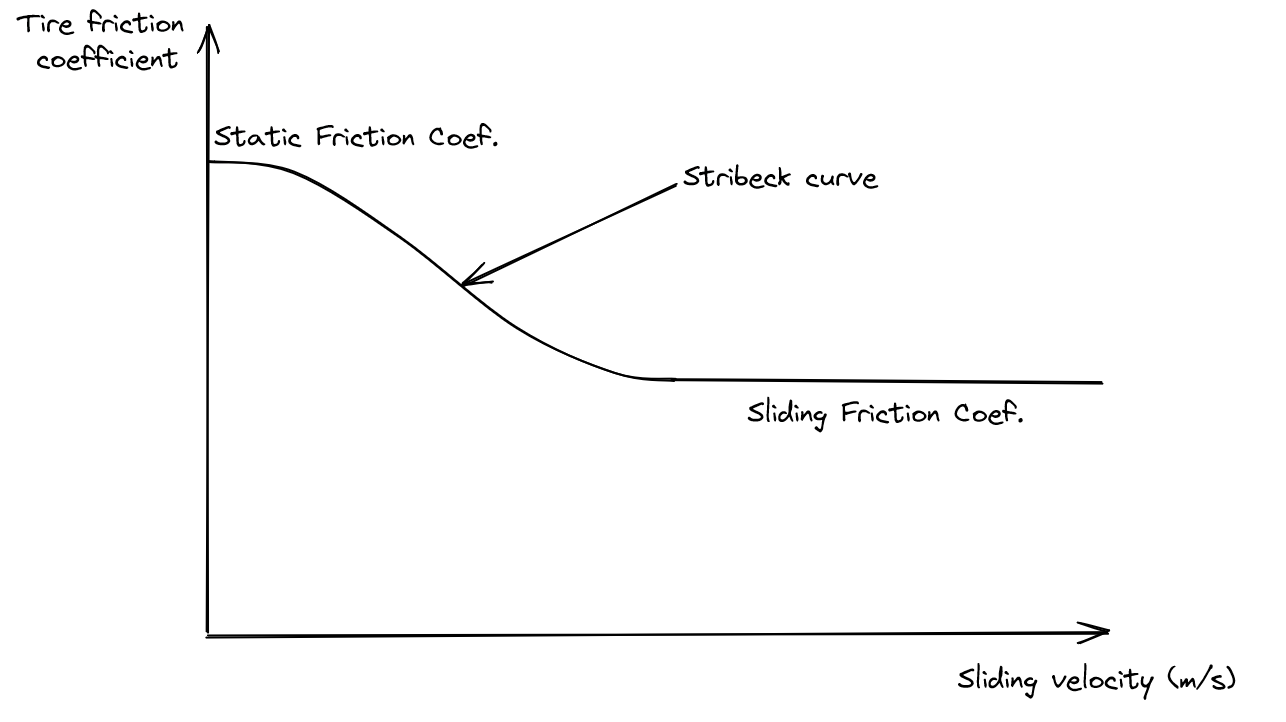
The first two parameters are the “frictionCoef” and “slidingFrictionCoef” parameters, which are friction multipliers when the tire is rolling, and when it’s sliding. As with most objects, tires can require less force to keep sliding once they’re already sliding, meaning that the sliding friction coefficient is lower than the static friction coefficient.
Since rubber has some flexibility, tires do not abruptly go from static friction to sliding friction and tend to do it progressively. To simulate this behavior, the Stribeck curve, which defines the transitory behavior from static to sliding friction, can be used.
The stribeckVelocity parameter will affect the overall length of the transition, with larger numbers resulting in a tire that will more slowly transition to sliding friction.
The stribeckExponent parameter will smooth out the top and bottom parts of the curve, resulting in a more bell shaped curve.
Tire load
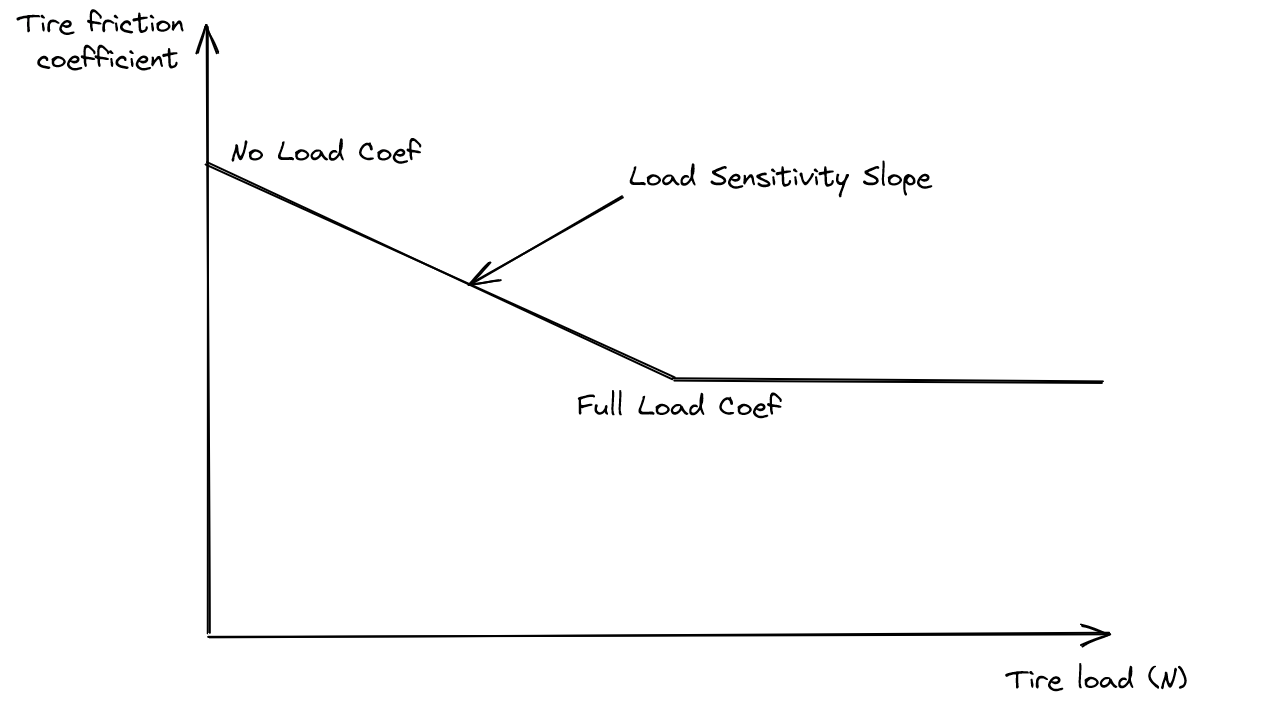
In standard friction models, friction force is directly proportional to the load on the surface. However, with tires, it’s a little more complicated than that, as tires aren’t completely rigid in the way they interface the ground. Their frictionCoefficient is slightly better at lighter loads comparatively, which also helps the tire react more progressively to load changes when braking and cornering.
Three parameters are used; “noLoadCoef”, “loadSensitivitySlope” and “fullLoadCoef”. noLoadCoef will usually be slightly above one, and fullLoadCoef slightly under. The load sensitivity slope affects how quickly the tire reaches the fullLoadCoef. The end result is a curve similar to this :
As the force is calculated per node, the normal force used is the force on each individual node, not the force on the wheel itself.
Required arguments
The standard naming for 4 wheeled vehicles is FR, FL, RR and RL.
This will be used when referring to the wheel in other sections, like the powertrain.
Optional arguments
Basic settings and dimensions
These arguments define the size and position of the wheel, along with some basic structural parameter
If this is not defined, the inner axle node will be used.
It should be located in the center of the wheel, where the center of the brake disc would be located. It should be heavy enough for the desired braking power. For a typical car, they should be at least 2kg. For a large truck, as much as 5-10kg.
The torqueCoupling node should be defined either at the differential, or differential output node.
As with nodeArm/Coupling, nodes that are heavier and further apart will allow for more torque to be transmitted before running into stability issues.
If torqueCoupling or torqueArm are not defined, the game will default to not generating drivetrain torque reactions.
This node should be located on the same structure as the torqueCoupling, and not move compared to it during typical driving. The engine itself, axle, or suspension subframes can be decent choices depending on the suspension and powertrain layout.
As with nodeArm/Coupling, nodes that are heavier and further apart will allow for more torque to be transmitted before running into stability issues.
If torqueCoupling or torqueArm is not defined, the game will default to not generating drivetrain torque reactions.
Will default to one of the axle nodes if not defined.
Should be part of the same structure as torqueCoupling and torqueArm, and not move compared to them during typical driving. The engine itself, axle, or suspension subframes can be decent choices depending on the suspension and powertrain layout.
As with nodeArm/Coupling, nodes that are heavier and further apart will allow for more torque to be transmitted before running into stability issues.
This node should also not form a line between it, torqueArm2 and torqueCoupling.
Node Arguments
Node settings define the friction parameters of the wheels, along with the weight of the wheels, both for the tire and hub.
0.38.5.0 the following physics materials are available:METAL, PLASTIC, RUBBER, GLASS, WOOD, FOLIAGE, CLOTH, WATER, ASPHALT, ASPHALT_WET, SLIPPERY, ROCK, DIRT_DUSTY, DIRT, SAND, SANDY_ROAD, MUD, GRAVEL, GRASS, ICE, SNOW, FIRESMALL, FIREMEDIUM, FIRELARGE, SMOKESMALLBLACK, SMOKEMEDIUMBLACK, STEAM, RUMBLE_STRIP, COBBLESTONE, FOLIAGE_THIN, SPIKE_STRIPA slick tire will be 0, an offroad tire about 0.9 and a standard tire 0.7.
This value is multiplied against a roughness coefficient for each ground type (mud has a high roughness, asphalt has very little) this means that a mud tire now works well in mud but mediocre on pavement, a slick works well on pavement but horribly on mud.
This value affects tire sounds, so it is important to set a realistic value even if the vehicle has no physical tires.
Allows to give the tire comparatively more grip when unloaded, which helps the tire react more progressively to weight transfers and load changes.
This value should be higher than the “fullLoadCoef”
Allows to give the tire comparatively less grip when fully loaded, which helps the tire react more progressively to weight transfers and load changes.
This value should be lower than the “noLoadCoef”
0.38.5.0 the following physics materials are available:METAL, PLASTIC, RUBBER, GLASS, WOOD, FOLIAGE, CLOTH, WATER, ASPHALT, ASPHALT_WET, SLIPPERY, ROCK, DIRT_DUSTY, DIRT, SAND, SANDY_ROAD, MUD, GRAVEL, GRASS, ICE, SNOW, FIRESMALL, FIREMEDIUM, FIRELARGE, SMOKESMALLBLACK, SMOKEMEDIUMBLACK, STEAM, RUMBLE_STRIP, COBBLESTONE, FOLIAGE_THIN, SPIKE_STRIPHarder tires squeal more.
This value affects tire sounds, so it is important to set a realistic value even if the vehicle has no physical tires.
Beam Generation Arguments
Keep numRays between 10 for small basic wheels to 20 for smoothest running. Most vanilla wheels have 16 rays
While it is true that a high numRay wheel runs smoother, this effect is mainly only noticeable at low speed (<10km/h).
High numRay wheels use considerably more nodes, beams, and triangles, using up more of the CPU budget. Wheels with high numRays will also run into stability issues quicker, meaning they might struggle to achieve the cornering and longitudinal stiffness of a real tire, leading to smooth but vague handling. They may also suffer from greater amounts of expansion at high speeds.
0.38. Used to keep tire nodes away from the rim after the tire has deflated, by simulating the collision between the tire nodes and the wheel center via precompressed support beams. Useful on very thick tires.Beam Arguments
Beam settings define the parameters of all the beams that make up a pressure wheel.
Each parameter listed bellow has Spring, Damp, Deform and Strength parameters, which can be used by replacing the “*” symbol with the property you want to change.
For example, the spring setting of the hubBeams would be “hubBeamSpring”, while the deform would be “hubBeamDeform. All those parameters work in a similar way as the parameters for standard beams.
Spring and Damp affects longitudinal stiffness (higher->stiffer), rolling resistance(higher->better), sharpness of lateral grip curve (higher->sharper peak), compression stiffness to a small extent (higher ->stiffer in compression)
The spring value should be as high as possible, on the limit of instability, to keep the tire from expanding at higher speeds.
Spring and Damp affects lateral stiffness primarily at lower slip angles (higher->stiffer). Low values can make a tire that tends to roll onto the sidewall more under hard cornering. Too high of a value reduces aligning torque.
The spring value should be as high as possible, on the limit of instability, to keep the tire from expanding at higher speeds.
Spring and Damp primarily affects lateral stiffness from low to high slip angles (higher->stiffer)
The spring value should be fairly high, up to about 50-75% of the sideBeamSpringExpansion or at the limit of stability.
Spring and Damp affects longitudinal stiffness (higher->stiffer). Also affects compression stiffness, high speed expansion, high speed grip.
Should be nearly the same as treadBeamSpring for narrow tires, but stiffer for wide tires.
SidewallRatio defines beamPrecompression argument of the support beams: precompression range = (hub radius - tire radius) * sidewall ratio. This value defaults to 0.9 if not present.
LongExtent defines the beamLongBound argument of the support beams directly. If not present, defaults to 2 * sidewallRatio.
Collision/Pressure Tri Arguments
This value should be set to a realistic value for the tire size and application.
Here are some examples of various real life applications of tires:
- Car, typical road tire: 25-35psi
- Car, racing slick: 22-27psi
- Light truck: 30-50psi
- Rock Crawler: 5-15psi
- Heavy truck: 50-100psi
- Aircraft: 100psi+
When enabled, tires will not clip right through firewalls, for example, but may get stuck in sharp bodywork after a collision. More CPU resources are needed when this is enabled.
This argument, as well as the other triangle collision related ones, is normally only used on off-road vehicles with big tires, where simulating accurate tire collision is more important.
These triangles are behind the tire surface, meaning that they will normally not collide with anything, so this argument is not useful in standard use cases.
Not affected by triangleCollision argument.
Side 1 is normally the inner side, while Side 2 is the outer.
Not affected by triangleCollision argument.
Side 1 is normally the inner side, while Side 2 is the outer.
Not affected by triangleCollision argument.
Hubcap Arguments
Negative values will cause the center node to be outside of the wheel, while positive values will result in the center need being inside the wheel.
This should not be left at 0, as the center node acts as a rigidifier. 0.06 is a common value.
0.38.5.0 the following physics materials are available:METAL, PLASTIC, RUBBER, GLASS, WOOD, FOLIAGE, CLOTH, WATER, ASPHALT, ASPHALT_WET, SLIPPERY, ROCK, DIRT_DUSTY, DIRT, SAND, SANDY_ROAD, MUD, GRAVEL, GRASS, ICE, SNOW, FIRESMALL, FIREMEDIUM, FIRELARGE, SMOKESMALLBLACK, SMOKEMEDIUMBLACK, STEAM, RUMBLE_STRIP, COBBLESTONE, FOLIAGE_THIN, SPIKE_STRIPBrakes arguments
These settings affect the parameters that apply to the brakes on this wheel.
Most parameters are related to the brake thermals system, which calculates the amount of energy heating up the rotor, and how quickly it cools.
Used for the thermals calculations.
Defines the cooling area of the brakes.
Used for the thermals calculations.
Affects the thermal inertia of the brakes. Heavier rotors will heat up and cool down more slowly.
Used by the thermals calculations, and affects how quickly the rotors cool down.
The available options are “vented-disc, disc and drum”
Used by the thermals calculations, and affects the heat capacity of the rotors, their maximum operating temperature, along with how quickly they cool down.
The available options are “steel, aluminum, aluminium, carbon-ceramic and godmode”
Affects the braking force vs temperature curves.
The available options are “basic, premium, sport, semi-race, full-race.”
Specific to simplified traffic cars
These arguments are used to send tire data to the tire sound system for simplified traffic vehicles which have no actual tires for optimization purposes.
Simple example
A simple tire-less wheel, not separated into individual components.
"pressureWheels": [
    ["name","hubGroup","group","node1:","node2:","nodeS","nodeArm:","wheelDir"],

    //general settings
    {"hubRadius":0.08},
    {"wheelOffset":0.005},
    {"hubWidth":0.025},
    {"numRays":10},
    {"hasTire":false}
    //hub options
    {"hubBeamSpring":251000, "hubBeamDamp":5},
    {"hubBeamDeform":40000, "hubBeamStrength":160000},
    {"hubNodeWeight":0.1},
    {"hubNodeMaterial":"|NM_RUBBER"},
    {"hubFrictionCoef":0.8},
    //stabilizer wheel
    {"propulsed":0},
    {"brakeTorque":0},
    {"parkingTorque":0},
    {"selfCollision":true},
    {"collision":true},
    ["STR", "stabwheel_R", "stabwheel_R", "stw1r", "stw1rr", 9999, "sta1r", 1{"speedo":false}],
    {"propulsed":0},
    {"hasTire":true},
],
Advanced example
A pair of front wheels split into individual components.
Hubs:
"pressureWheels": [
    ["name","hubGroup","group","node1:","node2:","nodeS","nodeArm:","wheelDir"],
    {"disableMeshBreaking":false,"disableHubMeshBreaking":false,"hasTire":false},

    //general settings
    {"hubRadius":0.18},
    {"wheelOffset":-0.04},
    {"hubWidth":0.160},
    {"numRays":16},
    //hub options
    {"hubTreadBeamSpring":901000, "hubTreadBeamDamp":6},
    {"hubPeripheryBeamSpring":901000, "hubPeripheryBeamDamp":6},
    {"hubSideBeamSpring":1351000, "hubSideBeamDamp":6},
    {"hubNodeWeight":0.40},
    {"hubNodeMaterial":"|NM_METAL"},
    {"hubFrictionCoef":0.5},
    {"hubBeamDeform":15000, "hubBeamStrength":66000},
],
Tires:
"pressureWheels": [
    ["name","hubGroup","group","node1:","node2:","nodeS","nodeArm:","wheelDir"],
    {"disableMeshBreaking":false,"disableHubMeshBreaking":false,"hasTire":false},

    {"hasTire":true},
    {"enableTireReinfBeams":false},
    {"enableTireLbeams":true},
    {"enableTireSideReinfBeams":false},
    {"enableTreadReinfBeams":true},
    {"enableTirePeripheryReinfBeams":true},

    //general settings
    {"radius":0.28},
    {"tireWidth":0.135},

    //tire options
    {"wheelSideBeamSpring":"$=$tirepressure_F*550","wheelSideBeamDamp":20},
    {"wheelSideBeamSpringExpansion":281000,"wheelSideBeamDampExpansion":30},
    {"wheelSideTransitionZone":0.09,"wheelSideBeamPrecompression":0.98},

    {"wheelReinfBeamSpring":15000,"wheelReinfBeamDamp":140},
    {"wheelReinfBeamDampCutoffHz":500,"wheelReinfBeamPrecompression":0.98},

    {"wheelTreadBeamSpring":50000,"wheelTreadBeamDamp":50},
    {"wheelTreadBeamDampCutoffHz":500,"wheelTreadBeamPrecompression":0.98},

    {"wheelTreadReinfBeamSpring":120000,"wheelTreadReinfBeamDamp":40},
    {"wheelTreadReinfBeamDampCutoffHz":500,"wheelTreadReinfBeamPrecompression":0.98},

    {"wheelPeripheryBeamSpring":35000,"wheelPeripheryBeamDamp":23},
    {"wheelPeripheryBeamDampCutoffHz":500,"wheelPeripheryBeamPrecompression":0.98},

    {"wheelPeripheryReinfBeamSpring":95000,"wheelPeripheryReinfBeamDamp":23},
    {"wheelPeripheryReinfBeamDampCutoffHz":500,"wheelPeripheryReinfBeamPrecompression":0.98},

    //general tire values
    {"nodeWeight":0.11},
    {"nodeMaterial":"|NM_RUBBER"},
    {"triangleCollision":false},
    {"pressurePSI":"$tirepressure_F"},
    {"dragCoef":5},
    //groundmodel friction multipliers
    {"frictionCoef":1.0},
    {"slidingFrictionCoef":1.0},
    {"treadCoef":0.7},
    //advanced friction values
    {"noLoadCoef":1.28},
    {"loadSensitivitySlope":0.00019},
    {"fullLoadCoef":0.4},
    {"softnessCoef":0.7},
    //deform values
    {"wheelSideBeamDeform":11000,"wheelSideBeamStrength":15000},
    {"wheelTreadBeamDeform":10000,"wheelTreadBeamStrength":13000},
    {"wheelPeripheryBeamDeform":40000,"wheelPeripheryBeamStrength":40000},
],
Hubcaps:
"pressureWheels": [
    ["name","hubGroup","group","node1:","node2:","nodeS","nodeArm:","wheelDir"],
    //hubcap options
    {"enableHubcaps":true},
    {"hubcapSelfCollision":true},
    {"hubcapCollision":true},
    {"enableExtraHubcapBeams":true},
    {"hubcapOffset":-0.03},
    {"hubcapWidth":-0.025},
    {"hubcapRadius":0.11},
    {"hubcapBeamSpring":121000, "hubcapBeamDamp":4},
    {"hubcapBeamDeform":3500, "hubcapBeamStrength":15000},
    {"hubcapAttachBeamSpring":121000, "hubcapAttachBeamDamp":8},
    {"hubcapAttachBeamDeform":1200, "hubcapAttachBeamStrength":1800},
    {"hubcapSupportBeamDeform":2500, "hubcapSupportBeamStrength":5000},
    {"hubcapNodeWeight":0.06},
    {"hubcapCenterNodeWeight":0.06},
    {"hubcapNodeMaterial":"|NM_METAL"},
    {"hubcapFrictionCoef":0.7},
],
Brakes:
"pressureWheels": [
    ["name","hubGroup","group","node1:","node2:","nodeS","nodeArm:","wheelDir"],
    //brakes
    {"brakeTorque":"$=$brakestrength*1350"},
    {"brakeInputSplit":1},
    {"brakeSplitCoef":1},
    {"parkingTorque":0},
    {"brakeSpring":125},
    //brake thermals
    {"enableBrakeThermals":true},
    {"brakeDiameter":0.24},
    {"brakeMass":4.0},
    {"brakeType":"vented-disc"},
    {"rotorMaterial":"steel"},
    {"brakeVentingCoef":1.0},
    //brake sounds
    {"squealCoefNatural": 0.0,"squealCoefLowSpeed": 0.0}
],
Adding the wheels to the car (note that all of the previous values are reset at the end, to prevent interfering with other wheels of the vehicle):
"pressureWheels": [
    ["name","hubGroup","group","node1:","node2:","nodeS","nodeArm:","wheelDir"],
    //front wheels
    {"selfCollision":false},
    {"collision":true},

    {"hubcapBreakGroup":"hubcap_FR"},
    {"hubcapGroup":"hubcap_FR"},
    {"axleBeams":["axle_FR"]},

    ["FR", "wheel_FR", "tire_FR", "fw1rr", "fw1r", 9999, "fh6r", 1, {"torqueCoupling:":"fh1r","torqueArm:":"fh2r","torqueArm2:":"fh3r","steerAxisUp:":"fh2r","steerAxisDown:":"fh1r"}],

    {"hubcapBreakGroup":"hubcap_FL"},
    {"hubcapGroup":"hubcap_FL"},
    {"axleBeams":["axle_FL"]},

    ["FL", "wheel_FL", "tire_FL", "fw1ll", "fw1l", 9999, "fh6l", -1, {"torqueCoupling:":"fh1l","torqueArm:":"fh2l","torqueArm2:":"fh3l","steerAxisUp:":"fh2l","steerAxisDown:":"fh1l"}],

    {"selfCollision":true},
    {"axleBeams":[]},{"disableMeshBreaking":false,"disableTriangleBreaking":false},
    {"hubcapBreakGroup":""},
    {"hubcapGroup":""},
    {"enableHubcaps":false},
    {"enableTireLbeams":false},
    {"enableTireSideReinfBeams":false},
    {"enableTireReinfBeams":false},
    {"enableTreadReinfBeams":false},
    {"enableTirePeripheryReinfBeams":false},
    {"loadSensitivitySlope":""},
    {"noLoadCoef":""},
    {"fullLoadCoef":""},
    {"frictionCoef":""},
    {"slidingFrictionCoef":""},
    {"softnessCoef":0.5},
    {"treadCoef":1.0},
    //cancel out brake properties
    {"brakeTorque":0},
    {"parkingTorque":0},
    {"enableBrakeThermals":false},
    {"brakeDiameter":false},
    {"brakeMass":false},
    {"brakeType":false},
    {"rotorMaterial":false},
    {"brakeVentingCoef":false},
],
Was this article helpful?