Building Architect
Introduction
The Building Architect is a tool that allows users to procedurally create and modify buildings directly within the engine.
Begin by selecting your desired shape, then customize it by adding and configuring various modular pieces through the Elements toggle section.
Additionally, you can set up roofs, change materials, and explore other exciting features.
Tool Window Overview
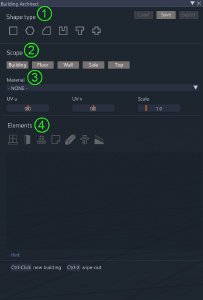
The tool window is divided into four main parts:
- Shape Type
Choose the basic building shape to start with. - Scope
Select a specific building part where changes will take effect. - Material and UV
Apply and configure materials to the structure. - Elements
Toggle modular pieces ON/OFF and set them up.Available modular pieces are limited in this version.
At the bottom of the window, available keyboard controls are listed for quick access.
Main Functions
Shape Type
The Shape Type section is the primary interface users interact with. It defines the default shape used to start building creation and offers various customization options.
Shape
There are six main shapes users can choose from:
- Square
- Hexagon
- Diamond
- U-shape
- T-shape
- X-shape
Usage
- Select a Shape
Left-click on a shape to select it. The selected icon will be highlighted, indicating active selection. - Place the Building
Left-click on a spot in the map viewport to place the building.- Spawn Point
The building spawns with its front-most left corner positioned at the clicked location.
- Spawn Point
- Default Dimensions
Generated buildings have default dimensions of 10x10x5.7 meters upon spawning.- Features:
2 floors, a set of placed windows, a door, and a flat roof.
- Features:
Save
Save button will allow user to store the work done with Building Architect in a .json file that will be placed in the active level path in an automatically generated …/bat/ folder.
When Save button is pressed a window will opens up asking user to give a name to the scene file.
Remember that save the scene through World Editor menu File > Save level won’t save the Buidling Architect session.
Load
Load button let user load a previously saved Building Architect .json file session and continue to edit it.
Saving and Loading Sessions
If you are working on a Building Architect session and wish to load a different one, please follow these steps to avoid losing your progress or generate possible issues:
-
Save Your Current Scene
- Ensure you save your existing work to prevent any loss of progress before loading a new session.
-
Clear the Current Session
- Press
Ctrl + Xto clean up the current session.
- Press
-
Load the Previously Saved Session
- After saving and clearing, you can safely load the desired previously saved session.
Export
When in Building Scope, users can select the entire building and press the Export button to save a Collada (.dae) file. This file can be opened in Blender or other software, allowing further customization or optimization.
Limitations:
- To be able to open the file in Blender, textures are not exported with the building.
- Polygonal distribution is not yet optimized for game-ready models.
Scope
Scope is the core functionality that controls how elements and parameters are updated on the building. Each scope has its own parameters that apply specifically to that scope.
Before exploring the different scopes, let’s understand interactions and general functions.
Interactions
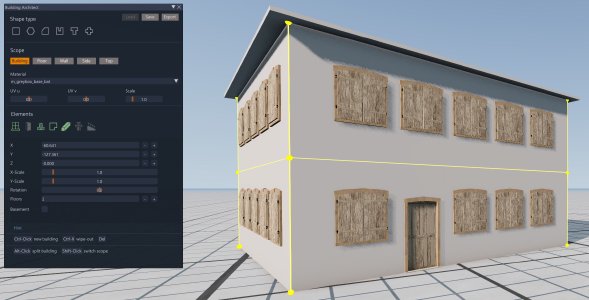
Understanding interactions with building parts is crucial. Once a building is placed in the scene, the first step to activate Scope selection is to click on any wall of the building. This action grants access to Scope selection, visualized by a yellow edge selection around the chosen building part.
By selecting a Scope, users can modify corresponding elements directly on the building, making the scope’s parameters available for adjustments.
General Functions
There are specific controls shared across all scopes.
Corner Drag
Function
|
Modify the building’s shape by dragging its corners. |
Usage
|
Hover over a corner, click, and drag to reshape. |
Split
Function
|
Subdivide walls or roofs to create new selectable elements. |
Usage
|
Press and hold the Alt key, hover over a wall or roof to create a preview line, then left-click to split. |
Multiple Polygons Selection
Function
|
Select multiple building parts simultaneously. |
Usage
|
In Floor, Wall, or Side Scope, press and hold the Ctrl key and left-click on multiple parts. |
Wipe-out
Function
|
Delete all placed buildings in the scene. |
Usage
|
Press Ctrl + X |
New Building
Function
|
Place a new building using the last selected shape. |
Usage
|
Press Ctrl + in the scene. |
Building Selection
Function
|
Select and modify a specific building when multiple buildings are present. |
Usage
|
Left-click on the walls of the desired building to activate it. All subsequent changes will apply to the selected building. |
Delete
Function
|
Remove a specific building or a specific building floor. |
Usage
|
Press Delete |
Conditions:
- In Building or Floor Scope: Deletes the entire building or selected floor.
- In other scopes: No effect.
Snap
Function
|
Perfectly align extruded/moved walls or cut roofs using existing walls as snap guide. |
Usage
|
Refer to the video example below: |
Building Scope
When selected, parameters in the Building Scope affect the entire building’s walls but not the roof.
Parameters:
X, Y, Z
Function
|
Move the entire building along the respective world axis. |
Usage
|
Enter numeric values to adjust position. |
X/Y Scale
Function
|
Scale the building’s dimensions along the X or Y axis. |
Usage
|
Move the slider to adjust scale. All applied elements update accordingly. |
Rotation
Function
|
Rotate the building around its center. |
Usage
|
Adjust the rotation value. All applied elements update accordingly. |
Floors
Function
|
Add or remove floors from the selected building. |
Usage
|
Use the add/remove floor buttons. Added floors are cloned from the floor below. |
Basement Toggle
Function
|
Add a basement beneath the ground floor. |
Usage
|
Toggle the basement option. The basement is treated like a floor with specific characteristics. |
Behavior
|
Once toggled, the Scope automatically switches to Floor. |
Floor Scope
When selected, parameters in the Floor Scope affect the selected floor’s walls.
Parameters:
Height
Function
|
Adjust the height of the selected floor. |
Usage
|
Enter a numeric value to set the desired height. |
Extrude/Intrude
Function
|
Extrude or intrude the entire floor. |
Usage
|
Use the extrude/intrude buttons to modify floor geometry. |
Rotation
Function
|
Rotate the floor around its center. |
Usage
|
Adjust the rotation value. All applied elements update accordingly. |
Clone
Function
|
Duplicate the selected floor. |
Usage
|
Select a floor and press the Clone button to copy it above with all modifications intact. |
Wall Scope
When selected, parameters in the Wall Scope affect the selected wall.
Parameters:
Extrude/Intrude
Function
|
Modify the selected wall’s geometry. |
Usage
|
Use the extrude/intrude slider. |
Side Scope
When selected, parameters in the Side Scope affect the building’s side walls as a whole.
Parameters:
Extrude/Intrude
Function
|
Modify the entire side of the building. |
Usage
|
Use the extrude/intrude slider. |
Top Scope
The Top Scope is the most complex, offering extensive functions and parameters. Changes in this scope affect the top part of the building above the last floor.
Parameters:
Margins
Function
|
Control the extension of the roof sides. |
Usage
|
Adjust the margin value to extend or retract roof edges. |
Thickness
Function
|
Adjust the roof’s thickness. |
Usage
|
Enter a numeric value or use the slider. |
Tip Height
Function
|
Set the maximum height of the roof’s peak. |
Usage
|
Adjust using the slider. |
Rotate
Function
|
Rotate the roof. |
Usage
|
Available only for Shed and Gable roof types. |
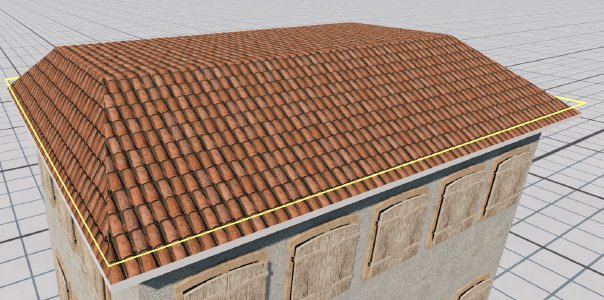
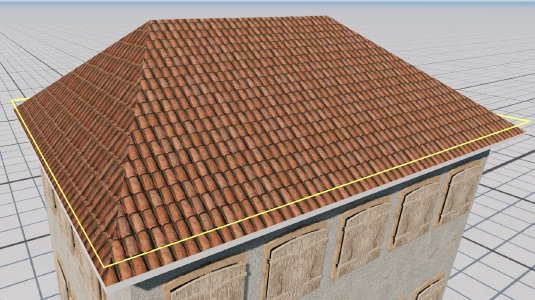
Roof Types

- Flat:
A simple, flat roof covering the building. - Pyramid:
A pyramid-shaped roof. Compatible with multiple building sides. - Shed:
A single-sloped roof. Compatible with multiple building sides. - Gable:
A classic triangular roof with two sloping sides.
Special Toggles

Ridge
Function
|
Adds a ridge to the roof. Not all roof shapes support the Ridge Toggle yet.
|
Features
|
Flat Top Toggle: Flattens the ridge based on ridge thickness. Flat top toggleRidge Thickness: Defines the thickness of the flat ridge section on the roof’s shortest side. Slope inclination is determined by the Tip Height value.
 Ridge toggle
 |
Border
Function
|
Creates a procedural border mesh around the roof base. Applicable only to Flat roof types. |
Controls
|
Border Width: Adjusts the border’s width, measured from the central point on the XY axis. Border Height: Adjusts the border’s height, measured from the central point on the Z axis. Border In/Out: Moves the border inside or outside the building’s wall limits. Border Lifting: Moves the border up or down. |
Material and UV
This section is extensively used during building customization, defining the materials applied to the building’s walls and roofs.
Material
A dropdown menu lists available materials. The Material window is sensitive to the selected Scope, adjusting the list of available materials accordingly.
- Behavior:
- If the Scope is set to building walls, only wall-specific materials appear.
- If the Scope is set to the roof, only roof-specific materials appear.
UV and Scale
Three parameters are available to adjust the building’s texture mapping:
- UVu: Moves the UV map along the U-axis.
- UVv: Moves the UV map along the V-axis.
- Scale: Adjusts the scale of the UV map based on the selected Scope.
Elements toggle

The Elements Toggle is a consistent part of Building Architect’s functionality. Elements refer to all modular building parts that are not procedurally generated but are placed procedurally on the structure.
Workflow Example
Scenario:
You have a square building with the default setup: 2 floors, windows on both ground and first floors, and a door on one side of the ground floor. You want to move the door to another side.
Steps:
- Select Wall Scope
Navigate to the Wall Scope to modify specific walls. - Select the Wall with the Door
Click on the wall where the door is currently placed. - Toggle Door OFF
Press the Door toggle to remove the door from the active side. This action turns OFF the door on the selected side but keeps it ON for the other three sides. - Select the Desired Wall
Click on the wall where you want to place the door. - Toggle Door ON
Press the Door toggle to add the door to the newly selected wall.
Element selection
All elements applied to the building are selectable. Users need to select the appropriate element(s) to access their corresponding parameters. Below are the available elements and their functions.
Window

Once toggled or window meshes are selected, users can access window parameters.
Mesh
Function
|
Change the window module type. |
Usage
|
Select from a dropdown menu. |
Bottom Margin
Function
|
Adjust the window’s position along the Z-axis, considering the bottom of the window mesh. |
Default
|
1 meter. |
Left Margin
Function
|
Move the starting position of window rows from the left side. |
Usage
|
Adjusting this value can change the number of windows applied to the building walls. |
Spacing
Function
|
Change the distance between windows. |
Usage
|
Adjusting spacing can also affect the number of windows on the walls. |
Scale
Function
|
Modify the scale of the window mesh. |
Usage
|
Adjust using the scale parameter. |
Single Element Selection
When in wall Scope the user can cycle through selection of multiple or single window by left click on the window. Like this will be possible to update a single window with another type
Door

Once toggled or door meshes are selected, users can access door parameters.
Mesh
Function
|
Change the door module type. |
Usage
|
Select from a dropdown menu. |
Position
Function
|
Move the door to the next position on the wall and reorder other elements accordingly. |
Usage
|
Adjust using the position parameter. |
Bottom Margin
Function
|
Adjust the door’s position along the Z-axis, considering the bottom of the door mesh. |
Usage
|
Enter a numeric value or adjust using the slider. |
Balcony

Once toggled or balcony meshes are selected, users can access balcony parameters.
Mesh
Function
|
Change the balcony module type. |
Usage
|
Select from a dropdown menu. |
Bottom Margin
Function
|
Adjust the balcony’s position along the Z-axis, considering the walking plane of the balcony mesh. |
Usage
|
Enter a numeric value or adjust using the slider. |
Scale Width
Function
|
Scale the width of the balcony. |
Usage
|
Adjust using the scale width parameter. |
Balcony Spacing
Function
|
Define the spacing of balcony meshes. |
Parameters
|
From Left Corner: Sets the starting position of the first mesh from the left side of the wall. Next Spacing (1): Defines the number of empty positions before the next visible mesh. Next Spacing (2): Defines additional empty positions, cycling from the first Next Spacing value. |
Corner

Once toggled or corner meshes are selected, users can access corner parameters.
Mesh
Function
|
Change the corner module type. |
Usage
|
Select from a dropdown menu. |
String Course

Once toggled or string course meshes are selected, users can access string course parameters.
Mesh
Function
|
Change the string course module type. |
Usage
|
Select from a dropdown menu. |
Bottom Margin
Function
|
Adjust the string course’s position along the Z-axis, considering the bottom of the string course mesh. |
Usage
|
Enter a numeric value or adjust using the slider. |
Pillar

Once toggled or pillar meshes are selected, users can access pillar parameters.
Mesh
Function
|
Change the pillar module type. |
Usage
|
Select from a dropdown menu. |
Spacing
Function
|
Evenly space the pillars starting from the center of the wall. |
Usage
|
Adjust using the spacing parameter. |
Match Width Button
|
Function
Lock external pillars to the wall corners.
Usage
Press the button to enable this feature. |
In-Out
Function
|
Move the pillars group inward or outward. |
Usage
|
Adjust using the In-Out parameter. |
Z-Span
Function
|
Adjust the height of the pillar base to fit the terrain when the Basement toggle is active. |
Usage
|
Enter a numeric value or adjust using the Z-Span parameter. |
Stair

Functionality:
- Stair Toggle can only be activated for the ground floor if the Basement toggle is active.
Workflow to Activate Stair Toggle:
- Go to Building Scope
Select the Building Scope to modify overall building parameters. - Activate Basement Toggle
Toggle the Basement option to add a basement. - Go to Wall Scope (or Floor, if applying stairs to all active doors on the floor)
Navigate to the appropriate Scope based on where you want the stairs. - Select the Door Element
Click on the door where you want to add stairs. - Activate Stair Toggle
The Stair toggle becomes active. Selecting it will adjust the basement height automatically to accommodate stair height.
Mesh
Function
|
Change the stair module type. |
Usage
|
Select from a dropdown menu. |
Troubleshooting & Limitations
- General Stability
- Building Architect is still under development. Various bugs not listed here may arise and will be addressed in future releases.
- Performance
- High-Floor Buildings:
Creating buildings with more than 7 floors may cause FPS issues on low-spec systems. - Multiple Building Types:
Working with more than three separate building types simultaneously can trigger FPS instabilities on low-spec systems.
- High-Floor Buildings:
- Element Placement
- Unwanted Holes:
Some elements may create unintended holes in walls due to procedural calculation inaccuracies. This can sometimes be fixed by re-scaling the elements or changing the mesh type.
- Unwanted Holes:
- Complex Building Shapes
- Roof Polygon Issues:
Complex building shapes may cause the roof’s polygon structure to revert or break.
- Roof Polygon Issues:
- Roof System
- Limited Options:
The roof system currently has limited customization options and may not work correctly with different shapes or configurations.
- Limited Options:
More important points to consider:
Testing Phase and Community Feedback
The Building Architect tool is being shared with the community in its current state to gather valuable feedback.
Your experiences and suggestions are crucial for refining and optimizing the tool in future updates.
Building Persistence
Buildings created using BAT do not automatically save within the game levels.
To preserve the work done, user must save the session using Building Architect Save button or export the building mesh.
- Navigate to Building Scope
- Select the entire building
- Press the Export button to save the building as a Collada (.dae) file
Recommendations for Modders
- Utilize BAT for Prototyping:
At this stage of the production of Building Architect we suggest the modders to use the tool only to rapidly create building prototypes and explore various architectural designs. - Export and Optimize:
If modder wants to further customize the mesh after creating a building the best way is to export it and perform necessary optimizations in an external 3D software. - Provide Feedback:
Share your experiences, report bugs, and suggest improvements to help us enhance BAT in future releases.
We appreciate your patience and feedback as we continue to develop and refine the Building Architect tool.
Was this article helpful?


