Overview and requirements
This section defines the scope of Level creation in BeamNG.drive and the conventions, tools, and file organization expected across this guide.
1.1 Scope
This guide covers the main tools and workflows used to create a BeamNG.drive level:
- Terrain, water, roads, vegetation, props, materials, decals, atmosphere, lighting, performance, testing, and packaging.
- The goal is a playable world that loads reliably, looks coherent, drives well, and can be packaged as a mod.
- Missions, Flowgraph, AI/traffic behavior, and scenarios are separate topics. This guide only covers the world/level foundation they can use later.
1.2 Supported versions
- This guide is a living document. All the sections will stay up to date following the World Editor progression
1.3 Required software and formats
The following brands of software are simply suggestions which allow you to have more control over possible ways to add assets to the level
- Blender (mesh authoring and .DAE export)
- Image editor for texture authoring (GIMP/Photoshop/Krita/Substance Suite/Affinity)
- Optional: JSON-friendly text editor (Notepad, Sublime Text, Visual Code, Kate)
- Formats used
- Meshes: Collada .DAE
- Textures: PNG only
- Heightmaps: 16-bit PNG (terrain specific)
1.3.1 First playable checklist
Before adding complex content, make sure the level has:
- A valid level folder under
/levels/your_map_name. - A default spawn point.
- Terrain, ground plane, or another drivable surface.
- At least one simple road or test driving area.
- Materials with no missing texture warnings.
- Daytime lighting that makes the road readable.
- No critical errors in the console/log after loading.
This small milestone helps you find path, material, spawn, and scale problems before the map becomes hard to debug.
1.4 World Editor interface
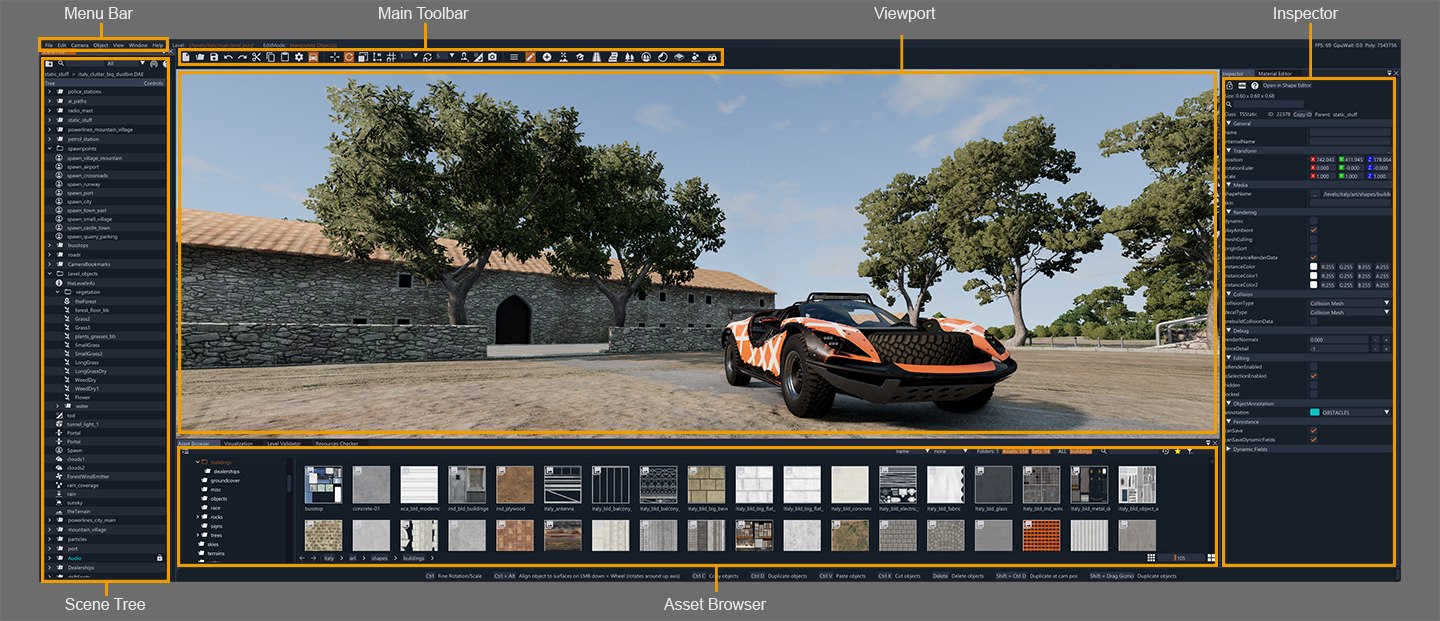 World Editor interface overview
1.5 Units, axes, and scale
- Coordinate system: Z-up
- Units: meters
- TSStatic export notes: apply transforms, triangulate and export tangents if using normal maps
1.6 Project structure standard
- Recommended level-domain folders:
/levels/YourMap(level.json, info.json, preview.png)- keeping the default folder subdivision is recommended
/levels/YourMap/mainfor scene object files/levels/YourMap/artfor level-specific meshes, textures, materials, and prefabs/levels/YourMap/sourcefor editable source files that should not be packaged
- Recommended naming conventions
- lowercase_with_underscores for files/folders
- Consistent prefixes by domain (road_asphalt_01, prop_guardrail_01)
Keep paths portable. Avoid absolute paths such as C:\... or D:\... inside level data.
1.7 Assets types (high-level)
Meshes
TSStatic defines a static mesh. A mesh is a 3D model, the standard class for static world geometry, composed of polygonal faces.
You can use different external modelling software like Blender, 3Ds Max, Maya, etc. to create 3D models and use the proper workflow to import it in BeamNG World Editor.
COLLADA (.dae) is the only supported format in BeamNG for static meshes
Textures
Image textures are part of a material definition, and they are projected onto a surface when the material is applied.
Textures are usually created using external software like Substance Painter/Designer, Photoshop or free ones like GIMP, then placed inside the proper explorer folder path to be read from the Asset Browser in World Editor.
A material can use different texture types like Base Color, Roughness, Normal and additional ones like Emissive or Detail.
The World Editor uses .png image formats and convert (bake) them to .dds once imported.
Materials
A material is the sum of several textures applied to a surface which defines it’s appearance.
You can also specify other parameters to define how it will interact with the environment: lights, shadows, transparency and also the Ground type that defines how it will behave with vehicles, all via Material Editor window.
Materials are saved in main.materials.json files which contain all the saved information about material setup.
Prefabs
A container with multiple objects (static meshes, lights, decalroads, etc.) is defined as a Prefab. It groups multiple objects into reusable assemblies that are saved in your project folder.
Prefabs can contain other prefabs too.
Package frequent compositions (e.g., intersections, parking lots, gas stations) as prefabs for repeatable placement.
Other main assets type
- Lights
- Sound emitters
- Cameras
Assets import
BeamNG engine assets can be imported in game by saving them in the map folder path.
Drag the file(s) inside the specific folder of your choice. The asset(s) will be available in the Asset Browser as soon as you run your map or, if your game is still running, you will see them appear in the selected folder.
Freshly imported textures may take a while to be baked from the system. You may need to reload the map to properly bake them.
1.8 Terrain and heightmaps (high-level)
- Terrains can use heightmaps. 16-bit PNG sources are recommended to avoid bending
- Terrain material variety and paint layers affect both the look and performance (details in the Terrain section)
1.9 Roads and drivable surfaces
- DecalRoads project surfaces onto terrain and meshes and suit most road uses
- MeshRoads generate geometry for bridges, tunnels (more as a guide), and complex profiles and can be textured
- Road and shoulder materials should be consistent with intended ground behaviour
1.10 Vegetation
- Forest manages large populations of instanced vegetation with density and variation controls
- Forest item is the container object that controls the vegetation behaviour. Props like rocks as well as any other static mesh can be added to the forest item
1.11 Atmosphere, lighting, and PostFX
- Global look is controlled via Time of Day, sky/skybox, fog/atmosphere
- Night scenes rely on dynamic lights with conservative budgets
- PostFX (exposure, SSAO, bloom, etc.) should preserve readability while driving
1.12 Performance and content budgets
- Keep an eye on budgets for triangle counts, material/texture variety, and dynamic lights per project with the Resource Checker tool
- Use LODs/impostors for large assets and atlases for small props/decals to control draw calls and memory
- See the Performance section for profiling practices and common bottlenecks
1.13 Packing and deliverables
- Distributable levels are self-contained and packaged as .zip for the in-game Repository
- Required metadata: info.json and preview.png. Level configuration: level.json
- Place authoring sources under /source; do not include them in the distributable
1.14 Starter Level template
- New level includes: spawn point, basic terrain, some terrain materials available, default sky/Time of Day, a water plane (ocean) and empty assets folders
- It serves as the reference baseline for the modder to start creating a level
Recommended first actions after creating a Starter Level:
- Rename the level and confirm it loads.
- Move the default spawn to a safe drivable position.
- Save the level and reload it.
- Add or import one small test asset.
- Create or assign one material and verify it survives reload.
- Drive the test area and check the console/log for errors.
1.15 Spawn points
Spawn points define where vehicles appear when the level loads or when the player resets. They are placed as SpawnSphere marker objects in the World Editor and referenced by name from the level’s info.json.
- A level should always include a default spawn (commonly named
spawns_default). - You can define multiple named spawns (e.g. per garage, point of interest, or scenario start) and expose them in the spawn selection UI through
info.json.
For the full object and metadata reference, see the SpawnSphere and Level metadata (info.json) docs.
1.16 Cross-references
- Terrain (2), Roads (3), Vegetation (4), Props (5), Materials (6), Atmosphere/Lighting (7), Performance (8), Testing (9), Packaging and publishing (10), Asset pipeline (11), Troubleshooting (12), References and glossary (13).
- Flowgraph, AI/Traffic, Scenarios/Missions have their own dedicated sections
Was this article helpful?