Props, buildings, and prefabs
5.1 Purpose
Define standards for static props, textures, buildings and reusable assemblies, with emphasis on scale, collision, and performance.
5.2 Requirements and conventions
Props and buildings must use consistent real-world scale and orientation.
Collision meshes should be simplified relative to render meshes but keep in mind to treat the collisions that will interact with vehicles detailed enough to avoid unrealistic behavior like tire sinking over mesh surface.
Disable collisions for tiny decorative items where safe to reduce memory costs.
Use available materials across maps assets. Reuse texture atlases, tilable or trim textures to save memory instead of baked materials.
5.3 Prefabs and modularity
Use modular kits for buildings, sidewalks, curbs, guardrails, etc. to ensure a quick assets creation and consistent snapping and spacing.
Use Prefabs to pack modules and reuse frequent compositions to make map creation quicker.
5.4 Urban and interior specifics
Maintain road clearances and sightlines around intersections
For tunnels and enclosed spaces, use occlusion/visibility tools like Zones objects where applicable to control light intensity and colors.
5.5 LOD policy
Level of Detail (LOD) is a key optimization technique: as an object moves farther from the camera, the engine swaps the high‑detail mesh for progressively simpler versions. Prepare multiple variants of the model with reduced polygon counts.
In BeamNG LODs are setup in an external software and imported following a specific pipeline.
Following is illustrated how you need to setup the scene in Blender and 3Ds Max to correctly export your mesh with LODs to make it works in engine:
Blender setup
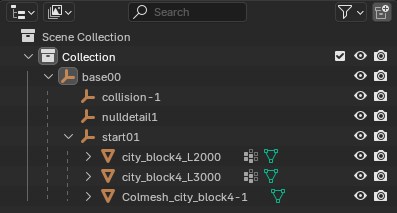 Blender export hierarchy setup
3Ds Max setup
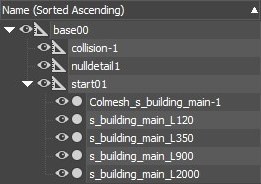 3Ds Max export hierarchy setup
LODs naming must be respected or the mesh will not work as intended when imported in game:
- The _Lnumber you see at the end of each LOD instance defines the number in screen pixels that determines the next LOD switch.
Keep material count per asset minimal and share materials among LODs.
As a rule of thumb every LOD switch should have polygons and material numbers halved.
Last LOD uses a particular material named lod_vertcol
Ideally, last LOD mesh should have this material applied to lower the overall memory of last LODs meshes present in the map
5.6 Performance guidance
Draw calls
To keep performances of the map higher draw calls needs to be limited, mainly via material and mesh reuse.
A draw call is a command issued by the CPU to the GPU instructing it to render a specific set of geometry using a defined material and shader state. It represents a single submission of rendering data to the graphics pipeline; any change in mesh, material, shader, or render state typically requires a new draw call.
Collision complexity
Ensure collision complexity is proportional to gameplay needs.
Collisions are a simplified version of the original mesh that is used from the system to determine the points of impact of the vehicles or other physical objects on the mesh.
The usual workflow is to keep collision meshes lower for meshes that usually are not in contact with the gameplay areas (higher buildings floor, objects that can’t be easily reached from players, etc.)
In BeamNG collision meshes are setup in an external software and imported following a specific pipeline.
Following is illustrated how you need to setup the scene in Blender and 3Ds Max to correctly export your collision mesh to make it works in engine:
Blender setup
Blender export hierarchy setup
3Ds Max setup
3Ds Max export hierarchy setup
Collision meshes are named as you see in the images examples above.
Upper case should be respected: Colmesh_``*meshname*``-1
To export the collision mesh together with the object mesh you should also select the base00, collision-1 and start01 container.
Notice:
The naming convention of the collision mesh that is important to respect is limited to Colmesh-1, the added mesh naming is arbitrary to keep meshes organized and recognizable.
5.7 Data locations
It’s always a good practice to put the meshes and textures used in the corresponding folders inside your map project path.
- Meshes:
YourMap/art/shapes/meshes - Materials/textures:
YourMap/art/textures - Prefabs:
YourMap/art/prefabs
See also: Prefab class , Prefab format , TSStatic class .
Was this article helpful?