Terrain, heightmaps, materials, and water
This section shows how terrain is represented, sourced, authored, and organized for a level, with quality and performance considerations.
2.1 Core concepts
Terrain is a heightfield. Elevation is driven by a 16‑bit grayscale heightmap image.
Terrain materials are different from asset materials and have a specific setup. Terrain materials are used to paint the terrain mesh.
Water is mainly represented with water planes. The tools used to place water objects are: Water block, River editor and Water plane
Terrain
The terrain is composed by different square tiles and is automatically optimized by the system.
Heightmaps must be 16‑bit PNG to preserve elevation details. Choose a heightmap resolution coherent with the world size
Shown below are the main parameters to check when placing a terrain for the first time.
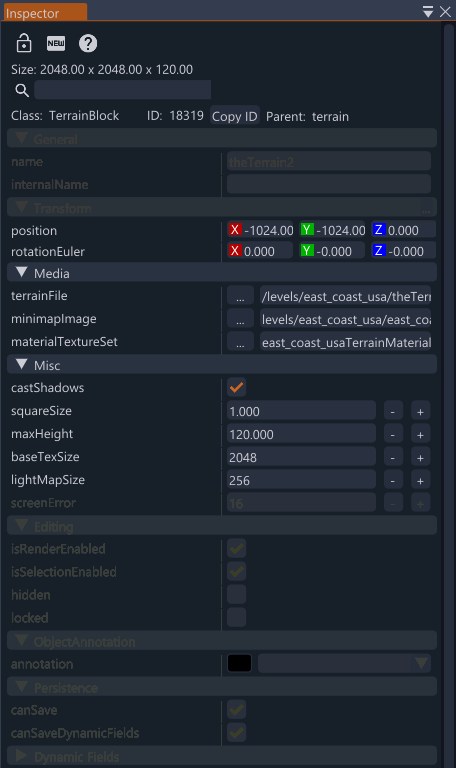 Terrain block parameters in the Inspector
position: determines the position of the terrain block in the world based on the lower left angle
terrainFile: shows the file path of your saved terrain block
minimapImage: used to set up the mini map image which shows roads
materialTextureSet: references the TerrainMaterialTextureSet object that defines the required pixel dimensions for base, macro, and detail texture arrays.
CastShadows: ON by default. When active. the Terrain block will cast shadows
squareSize: this parameter defines the smallest square dimension specified in mt/pixel
maxHeight: this parameter controls the total height of the terrain block
baseTexSize: legacy terrain base texture resolution. For v1.5 terrain materials, texture array dimensions come from the referenced TerrainMaterialTextureSet.
lightMapSize: lightmap dimensions in pixels (legacy terrain lightmap; has no effect under the current deferred lighting)
World scale uses meters with Z-up. Terrain size and height range should match intended outcome.
Terrain material textures should be in PNG format. Naming conventions used for normal materials can be ignored for terrain.
Relative path for terrain textures is usually located in: YourMap/art/terrains
Always keep the number of painted layers manageable to avoid memory overload and favor clear material separation (e.g., soil, rock, grass, sand).
See also: TerrainBlock class , Water class .
2.2 Authoring considerations
When generating or editing heightmaps externally, maintain 16‑bit precision and avoid resampling artifacts or the terrain will be visibly affected.
When using in-editor sculpting tools, establish broad forms first, then add local variations. Favor gentle slopes for general driveability. MeshRoad and road tools can help conform terrain around roads.
Terrain driving behavior comes from each painted material’s groundmodelName. The v1.5 terrain height textures control visual layer blending; they are not a terrain-wide driving-depth map. See Terrain format
and Groundmodels
.
Hole map
A hole map (theTerrain_holemap.png) lets you cut holes in the terrain surface, which is useful for caves, tunnel entrances, basements, or anywhere geometry needs to pass through the ground. It is a mask that matches the terrain resolution: masked areas remove the terrain surface (and its collision) so other meshes can show through. Holes can be painted directly with the Terrain Editor hole brush or supplied as an image during terrain import.
2.3 Terrain and terrain materials
Workflow to setup your new map terrain
- Open the World Editor with F11.
- Select File > New Level or press Ctrl+N.
- Choose a new folder under
/levels/. - The editor copies the current
levels/template/level into the new folder and opens it. You do not need to open the Template level first. - Open Terrain Tools > Terrain Painter and verify that
theTerrainreferences aTerrainMaterialTextureSet. - New levels created from the current Template already use v1.5 terrain materials. For an older level without a texture set, open the Terrain Material Library and select Upgrade Terrain Materials.
The TerrainMaterialTextureSet defines the required pixel dimensions for base, macro, and detail textures. Every texture assigned to the same slot type must match its corresponding texture-set size; these dimensions do not need to match the terrain heightmap.
Time to import the terrain heightmap
Go to Terrain tools and click on Import terrain icon
- To have a working terrain you have to setup the minimum necessary elements needed.
- Terrain name: should stay as it is
theTerrain - Meters per Pixel: if you already know the mt/px of the chosen heightmap you can set it up. Can be changed later.
- Max Height: if you already know the max elevation in meters of the chosen heightmap you can set it up. Can be changed later.
- Select the heightmap image
- Hole map and texture maps can be added later
- Select a position on xy axis of your terrain
- Click Import when ready
- Terrain name: should stay as it is
After clicking on Import you should see your terrain in place
Right now you will see black terrain. Let’s fix this.
- Go to Terrain tools > Terrain Painter
- Click on Terrain Material Library button
- Click on the
+sign beside Material Library to add a new terrain material
Terrain system works with a combination of 3 material type: Base texture, Macro texture and Detail texture
- Base texture
- Defines the broad appearance of the terrain material and can cover a large world area.
- Macro texture
- Used to render middle to far distance by giving subtle variations of colors, normals and roughness
- Detail texture
- Used to render close distance terrain
Base Material (BeamNG specific workflow)
- This material match the whole size of the map and is visible from close to far distance, the render should look like a satellite view
- It influences the render of all other terrain material types for colors, normals and roughness
- Texture size can be 0.5k, 1k, 2k, 4k, dependent on the map size
- Material export format is 8bit
- Normal map must be in tangent space and not include any heightmap information
Terrain textures parameters explained
Base color:
- Base mapping scale: world mapping size in meters, often the terrain world width for a unique whole-terrain base texture
- Macro mapping scale: can range between a min value of 30 up to 120 as max value but basic values are between 60 and 80, it really depends on the desired rendering
- Macro strength: first value is the intensity of near render, second value is the intensity of far render. Basically can be used from 0.1 to 0.2 for high contrast textures, and around 0.4/0.5 for low contrast textures
- Detail mapping scale: world mapping size in meters; values around 2 to 8 meters are common starting points
- Detail strength: first value is intensity of near render, second value the intensity of far render. For a good visual first value need to stay between 0.2 and 0.3. The second value should be 0, for a better fade at max distance
Normal:
- Base mapping scale: world mapping size in meters
- Macro mapping scale: can range between a min value of 30 up to 120 as max value but basic values are between 60 and 80, it really depends on the desired rendering
- Macro strength: first value determines near distance relief intensity, second value far distance relief intensity. Values should be between 0.5 and 1
- Detail mapping scale: world mapping size in meters
- Detail strength: first value is intensity of near render, second value the intensity of far render. For a good visual first value need to stay between 0.2 and 0.3. The second value should be 0, for a better fade at max distance
Too much difference of normal values or normal textures intensity between each terrain material creates a bad fade and really noticeable transitions between terrain materials
Normals are not additives between macro and detail. A higher macro normal value than detail normal value will reduce the normal intensity of detail
Roughness:
- Base mapping scale: world mapping size in meters
- Macro mapping scale: can range between a min value of 30 up to 120 as max value but basic values are between 60 and 80, it really depends on the desired rendering
- Macro strength: first value determines the roughness intensity at near distance, second value at far distance. Values should be between 0 and 1
- Detail mapping scale: world mapping size in meters
- Detail strength: first value is intensity of near render, second value the intensity of far render. For a good visual first value need to stay between 0.2 and 0.3. The second value should be 0, for a better fade at max distance
Terrain global roughness is very intense. The base terrain roughness influences a lot the intensity of macro and detail roughness. Middle values of gray for base terrain roughness makes terrain render very shiny For instance, dirt and grass areas of base terrain need to have gray values close to white. Asphalt should have middle values of gray and darker gray values are for wet areas like wet sand, mud, etc.
Roughness map are not additives between macro and detail. A higher macro roughness value than detail roughness value will reduce the roughness intensity of detail
Ambient occlusion:
- Base mapping scale: world mapping size in meters
- Macro mapping scale: can range between a min value of 30 up to 120 as max value but basic values are between 60 and 80, it really depends on the desired rendering
- Macro strength: first value determines the AO intensity at near distance, second value at far distance. Values should be between 0 and 1
- Detail mapping scale: world mapping size in meters
- Detail strength: first value is intensity of near render, second value the intensity of far render. Values should be between 0 to 1
Height:
- Base mapping scale: world mapping size in meters
- Macro mapping scale: can range between a min value of 30 up to 120 as max value but basic values are between 60 and 80, it really depends on the desired rendering
- Macro strength: normally left at 0 so the height texture controls layer blending without macro modulation
- Detail mapping scale: world mapping size in meters
- Detail strength: normally left at 0 so the height texture controls layer blending without detail modulation
TerrainMaterialTextureSet. See Terrain format: v1.5 terrain materials
for exact fields and blending behavior.Some suggestions about terrain paint
- Blend materials to avoid harsh seams. Use macro/micro variation to reduce visible tiling.
- Keep color and roughness behavior coherent across materials to maintain a believable look.
- For a believable transition between very different materials like grass/dirt > asphalt use decalroad edges to fake road edges that blends toward grass/dirt terrain material
2.4 Water
The game uses water planes to simulate lakes, reservoirs, pond and river surfaces as well as ocean you see in different legacy map of BeamNG.drive
There are 3 different tools to simulate water objects.
River editor
The best choice to create rivers/creeks. Placement of river object works like decalroads placement, just press ALT+click to place nodes of the river spline. Mind that the spline grid indicates the water flow direction with an arrow.
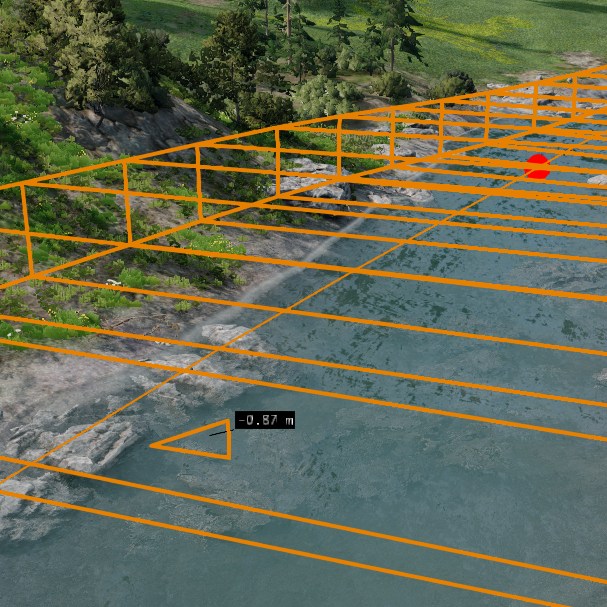
Ensure edges integrate with banks to blend them with terrain in a believable way.
Water plane
Represents a large body of water that stretches to the horizon in all directions. Best suited to oceans and sea-level water. Reflections are typically driven by a cubemap (see Materials, section 6.2).
Water block
A box-shaped water volume defined by a 3D scale and orientation. Best suited to bounded/contained water such as pools, reservoirs and tanks. The gridElementSize parameter controls the tessellation of the water surface.
2.5 Data locations
Terrain data and settings are stored in YourMap/ as theTerrain.ter and theTerrain.terrain.json. The companion heightmap generated when the terrain is saved is theTerrain.terrainheightmap.png.
Terrain export presets use theTerrain_holemap.png and per-layer files named theTerrain_layerMap_*.png.
Terrain materials and level-local terrain textures are stored in YourMap/art/terrains.
2.6 Common issues
- Banding from 8‑bit sources (use 16‑bit PNG).
- Scale mismatches after import (verify meters and vertical range).
- Noticeable tiling from single-scale textures (introduce macro variation).
See also: Terrain format , Groundmodels .
Was this article helpful?